
Plant This Fall for Spring Blooms
Planting bulbs in containers offers a solution to gardeners who lack the space to create a full garden. Spring blooming bulbs can be grown in decorative pots to add accents to patios, decks, and entryways. Bulbs planted in beds outside require little maintenance, however, with a few guidelines and commitment, container bulbs can prove equally as easy.
Simply put bulbs in containers are being grown outside of their natural environment. Bulbs lack the larger space for deep root growth in containers, which makes them susceptible to greater environmental change. Garden beds provide greater insulation, while container bulbs will be exposed to temperature fluctuations and different moisture amounts. Growing bulbs in containers requires more involvement from the gardener, but offers the same rewards come spring.
Bulbs can be grown in any size pot; however, they are generally planted closer together. Enough space should be given for healthy root development, but smaller spaces can be surprisingly successful. Larger pots offer the gardener variety; for example, 10 inch deep containers can hold two layers of bulbs, while a 14-inch deep container will be able to hold three layers. Gardeners should choose containers that will survive the winter months, as frozen soil expands and can destroy terra cotta, ceramic, and rigid plastic. Plastic containers can house the bulbs over winter where they can be placed in decorative pottery upon the arrival of warmer weather.
Potting soil that is relatively porous and fast draining is best for container bulbs. Avoid mixes heavy with peat moss, as they stay too wet for container bulbs. Avoid manure and mushroom compost as well. Spring bloomers prefer well-draining soil, and can freeze easily if drainage is problematic. Container bulbs are best planted closer to one another, but do not let them touch and offer enough room as possible for root development. Overcrowding can cause multiple problems and cause smaller blooms.
Keep soil moist, but not soaked. Check weekly for water, but do not water if the soil if frozen. If weather is wintry, it is best to bring the containers to a covered and secure area, like a shed or a garage. Direct sunlight can cause more harm than good, so keeping containers shaded, or in an environment such as a covered shed or garage can help control the extremities of winter, but still keep bulbs cool. A garage should be avoided if cars are stored there, as exhaust contains ethylene gas which will cause the flower to abort its growth and flowering process.
Once the threats of frost and snow have passed, the containers can be brought outside. Spring rains will be beneficial,
but pay attention during growth as the plants will begin to require more water. After blooms are spent, bulbs should be left to brown out as if they are in the ground. Bulbs that naturalize can be covered with pansies or lettuces for summer, to repeat the following year. Tulips should be composted and removed.
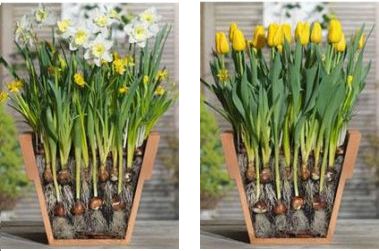
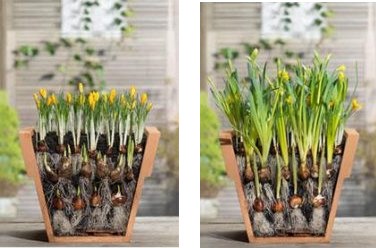
Choose bulbs with different bloom times for greater effect. Place a layer of gravel at the bottom of your container, followed by a layer of potting soil. Place the largest bulbs down at the bottom layer (alliums, tulips, daffodils, frittilaria, lilies) and top with soil. This can be followed by another layer of bulbs and so on, until the top of the container is reached. A good second layer can consist of tulips, hyacinth and galanthus, while the top layer could be muscari, crocus, scilla, chionodoxa, puschkinia. The tips of your final layer of bulbs should be just below the surface, but leave about an inch between the top layer of soil and the container. Tulips should be planted with the flat side facing outward to create cleaner leaves while growing.